The Creation of CARNIVAL

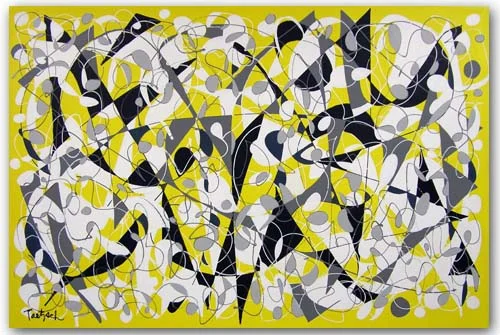
My first step in this new painting was to give the 40" x 36" stretched canvas two coats of Titanium white acrylic mixed with a gloss medium.  After it dried thoroughly, I painted sections of it with Mars black:

Step 1

Step 1

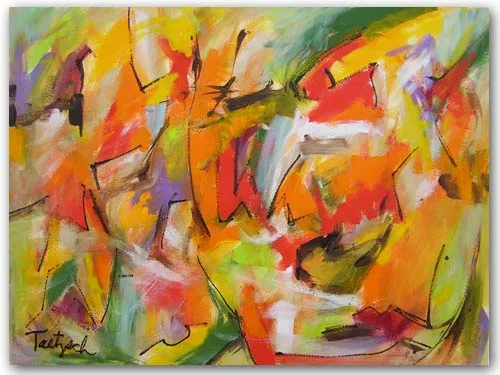
In my next painting session, I mixed some shades of pale orange, yellow, light green and aqua.  With a brush, I painted over sections, applying the paint in a very loose, expressionist manner.  I also added some cadmium red light, diluted with water and gloss medium.  Then I used a palette knife to make two slashes of Titanium white.

Step 2

Step 2

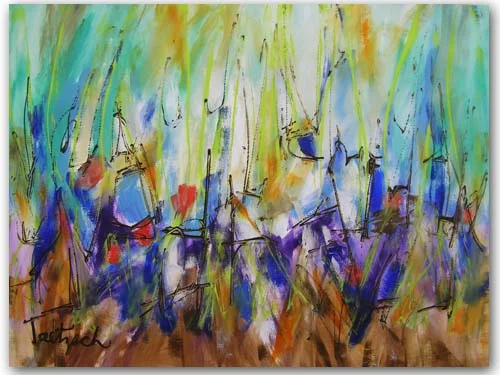
When I worked on this canvas again, I realized I had lost a lot of the openness I'd created initially by filling in too much of the painting with color.  So I dipped my brush in the white paint mixture and began to selectively paint over sections in order to restore that sense of spaciousness:

Step 3

Step 3

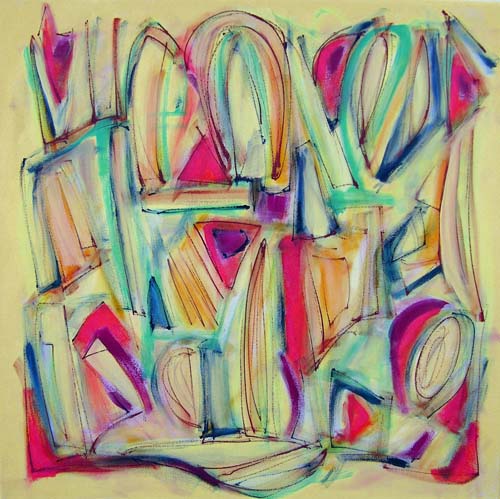
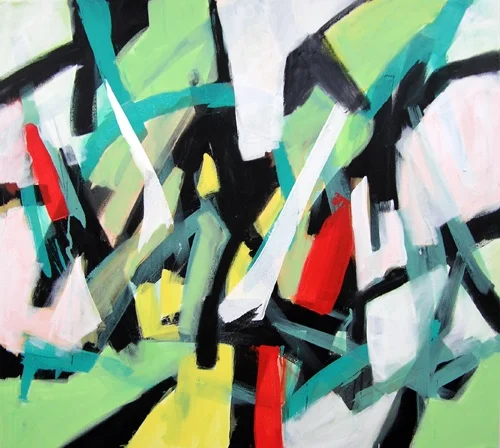
In this final stage of the painting, I first felt it needed more yellow, and added it selectively.  Then I gave myself license to add whimsical lines in white and black, which had a graffiti-like effect.  When I stepped back, I was satisfied:

Carnival, 40" x 30" x 1.5"

Carnival, 40" x 30" x 1.5"

The Evolution of An Abstract Painting

As I worked on a new 30" x 30" abstract painting over several days, I took photos of it along the way.  It was not a painting that came easily, and I'm still not sure if it's "finished."  I will let it sit for a while before I sign it. 

Here's the process step by step:

Step 1I began by painting the whole canvas in a light lemon yellow, which comes across with a tint of green in this photograph.  I was working loosely, brushing on some cadmium red deep, green gold, and a pale green here and there, blending the…

Step 1

I began by painting the whole canvas in a light lemon yellow, which comes across with a tint of green in this photograph.  I was working loosely, brushing on some cadmium red deep, green gold, and a pale green here and there, blending them in.

Step 2I added a lot more color here:  cadmium red light, Prussian blue, and cadmium yellow medium.  I also added in more of the pale green.  Again, I painted loosely, working in an overall fashion to develop the composition.  The…

Step 2

I added a lot more color here:  cadmium red light, Prussian blue, and cadmium yellow medium.  I also added in more of the pale green.  Again, I painted loosely, working in an overall fashion to develop the composition.  Then I drew lines in Prussian blue and brushed over them lightly to soften the effect.

Step 3At this stage I drew sketchy lines with burnt sienna, and then brushed over them to blend them a bit with the background colors.  I also used the pale yellow background color to soften a lot of the brighter yellows.  Finally, I drew …

Step 3

At this stage I drew sketchy lines with burnt sienna, and then brushed over them to blend them a bit with the background colors.  I also used the pale yellow background color to soften a lot of the brighter yellows.  Finally, I drew more lines with the Prussian blue.  At this point I might have called the painting "finished."  It felt good to me in many ways.  But it wasn't quite there yet.

Step 4I took a bold move here which changed the painting drastically and might not have worked:  I filled in spaces with small circles of color:  light Hansa yellow, medium yellow, and orange.  I also added more cadmium red light in p…

Step 4

I took a bold move here which changed the painting drastically and might not have worked:  I filled in spaces with small circles of color:  light Hansa yellow, medium yellow, and orange.  I also added more cadmium red light in places, and more of the pale green.  The image was now becoming more dense and solid.  But it felt like I'd gone in the right direction.

Step 5In this final step, I first painted the outer yellow area with cadmium yellow medium.  That created a kind of "frame" for the central image.  Then I began to fill in some of the small circles of color--first some orange, and then som…

Step 5

In this final step, I first painted the outer yellow area with cadmium yellow medium.  That created a kind of "frame" for the central image.  Then I began to fill in some of the small circles of color--first some orange, and then some of the Hansa yellow.  Now I have to step back and study the canvas.  The outer more golden yellow may be too strong.  I might have contrived and controlled too much and lost too much of the sketchiness I had at the beginning. 

Contemporary Paintings on Paper

Making contemporary paintings on paper instead of on stretched canvas takes some getting used to, since the texture of the surfaces is different.  The advantage of working on paper is that it is less expensive than canvas, but the final result then needs to be framed before it can be hung.

When I paint on canvas, I use gallery-wrapped canvases that are one and a half inches thick.  I paint the image around the sides of the canvas so that they can be hung without being framed.  Thus, I have no framing problem.

Paintings on paper are another story.  While I have made my own mats and frames in the past, this part of the process is really not my forte.  So I sell the paintings unframed, or use a framer downtown if my client wants their selection framed. 

Swept Away, 24" x 18" acrylic on watercolor paper.

Swept Away, 24" x 18" acrylic on watercolor paper.

Painting on paper is freer in some ways, once you get used to working with the painting surface.  By mixing the paint with water, you can get transparent and translucent effects similar to watercolors

Contemporary Art Twenty-Six, 24" x 18" acrylic on watercolor paper.

Contemporary Art Twenty-Six, 24" x 18" acrylic on watercolor paper.

Recently I think I found a solution to the framing problem.  I found pre-cut mats and ready-made metal frames that work well with my contemporary art.  They would allow me to offer framed paintings at a reasonable price. 

Now I'm trying to figure out how to represent the framed paintings digitally on my website.  I'm still working on that one.

Update:  An hour after posting this, I figured out how to show the painting framed using Photoshop.  See pic below:

Swept away, matted and framed.  Outside dimensions 28" x 22". 

Swept away, matted and framed.  Outside dimensions 28" x 22". 

Abstract Pattern Paintings

Recently I've been interested in the patterns made with overlapping lines that can be filled in with color to draw the eye across a canvas.  I usually begin by painting a solid background color and letting it dry before beginning to draw the lines.  In "Concatenation," I painted the whole canvas yellow.  Then I drew lines in white, gray and black. 

I was conscious, while filling in spaces with white, gray and black paint, of the patterns and connections being made between shapes.  There are various paths set up, depending on whether you follow the white, the gray, or the black connections. 

Concatenation, 60" x 40" 

Concatenation, 60" x 40"


In "Pecking Order Triptych," I painted three vertical canvases, each 10" x 48," in a light teal for the background.  Then I drew the lines in white, lime, teal and Prussian Blue.  I worked on all three canvases at once, developing each color pattern on all three before going to the next color.  By working on them all at the same time, I was able to ensure that the three panels would work together as a whole when hung side by side.  They also work if spaced further apart, depending on the room and space they are hung.

In "Sea Escape," which is a very large canvas (72" x 46"), I painted the background a light blue.  Then I drew lines in white and Prussian Blue.  This painting was more problematic, perhaps because of its large size.  I filled in spaces with white, pale green, a darker green, a medium blue, and Prussian Blue.  Sometimes I had to paint over one color because it didn't work.  Finally, I felt I'd gotten to the point where the image worked as a whole as well as in its parts. 

Sea Escape, 72" x 46"

Sea Escape, 72" x 46"

Which of the above abstract pattern paintings do you think is most successful?  Which one appeals to you the most?

When A Painting Gets Stuck

Some years ago, after a long holiday break, I had trouble getting back into a painting I had begun earlier.  What was I thinking when I started this canvas? 

Who knows, not me.

The background on this painting was black with two-inch parchment stripes across it.  I had worked on it once or twice after that, and there was a design or pattern taking shape, but it seemed too amorphous.  What I like to do often is to bring order out of chaos while leaving in enough signs of the chaos to retain a sense of ambiguity or chance.  There is a delicate balance that I find if I'm lucky. 

The reason I bring "luck" into it is that you have to simply take the plunge and try something to see if it works.  If it doesn't, you can't simply "erase it" and start over.  Once you've made a major move on a painting, you are pretty much committed to making it work.  You're not going to be able to remove the last layer of paint without disturbing what was beneath it. 

Well, on this particular painting, I chose to use raw umber lines to outline the parchment shapes, thereby creating more definition and less chaos.  From there, I went on to feather those lines with a brush, and the painting did look much better at that point.  I could almost have signed it and moved on.

That might have been the wiser choice, but instead I kept working at further definition. That is, I went too far in the defining direction, which then left the amorphous background looking out of place or "wrong."  To sum it up, I destroyed the delicate balance I had going for me and now the painting was completely out of kilter.  There was no way to simply "tinker" with it to bring it into balance. 

I waited a day for the canvas to dry, and tackled it again.  This time, I had some success.

Here it is, finally finished: my "stuck" painting:

Ringed Migration, 40" x 40" (sold)

Ringed Migration, 40" x 40" (sold)